Key takeaways
- The first step in how to fix a leaking gutter joint starts with cleaning the area around the leaking joint thoroughly. Dirt or old sealant will mess up the new fix.
- Apply a solid bead of sealant inside and outside the joint, then smooth it out for an even seal.
- Test with a garden hose to make sure the leak is gone. Reinforce with repair tape if needed.
Leaky gutter joint got you down? It’s one of those things you only notice when it’s pouring.
And when you do, suddenly you’ve got a big problem.
The good news? It’s a common fix. And some of the tools you already have at home can help.
Old sealant might be the issue. Or maybe some gunk is clogging things up.
Either way, the solution is simple.
With a few tools and a little time, you’ll have your gutters back in action.
We’ll walk you through five quick steps, from cleaning to leak testing.
Learn to spot some mistakes to avoid and when to call in professional gutter replacement services for a fix.
How to fix a leaking gutter joint
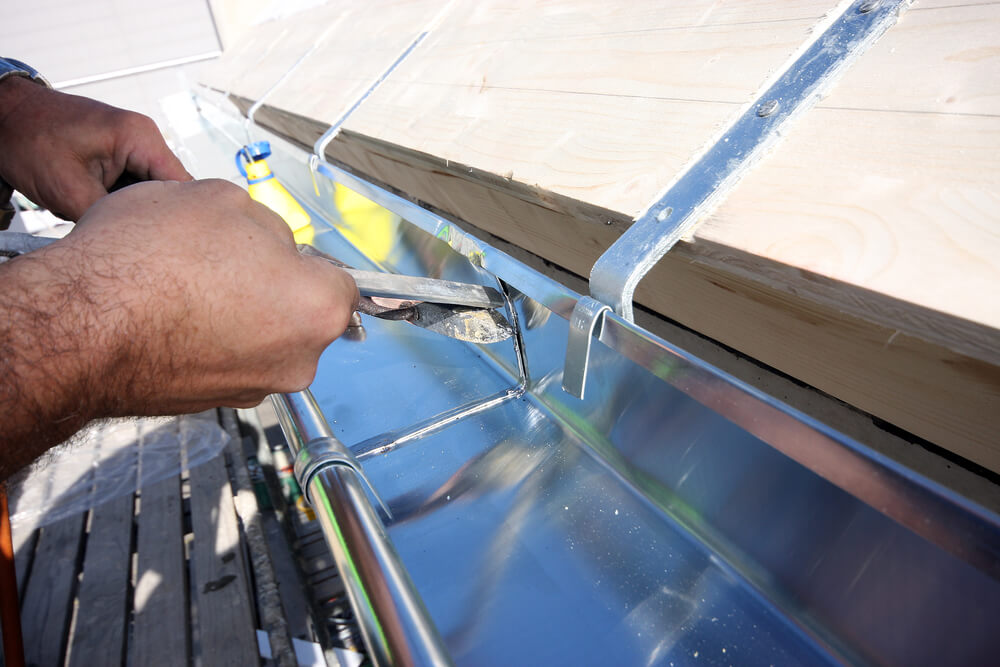
Step #1 — clean the area around the leak
Before you even think about applying sealant, you’ve got to clean the area. Skip this, and your repair won’t last.
Dirt, rust, or old sealant can prevent the new sealant from sticking properly, leading to more leaks down the line.
Start by putting on a pair of gloves. Handling gutter grime can be icky and also dangerous. Safely climb up your ladder and take a close look at the leaky joint.
Use a wire brush or some coarse sandpaper to scrub away any debris, rust, or old sealant stuck around the joint. Focus on making the surface as smooth as possible.
Once you’ve scrubbed away the bigger stuff, take a clean rag or cloth and wipe down the joint area.
Make sure you get rid of any remaining dust or particles. The surface should be both clean and completely dry before you move on.
If it’s even slightly damp, the sealant won’t stick properly, and you’ll end up redoing the job.
So take your time here. It’ll save you hassle later.
Step #2 — apply sealant
Now that the joint is clean, it’s time to seal it up.
Grab your caulking gun and load it with sealant or gutter caulk.
Remember to keep steady pressure on the trigger, and you’ll be fine.
Apply a good bead of sealant along both the inside and outside of the joint. You want enough to fully cover the area where the two pieces meet.
But don’t go overboard — too much can get messy and make the job look sloppy.
After applying the sealant, use a putty knife or your gloved finger to smooth it out.
This way, you’ll have an even spread and a tight seal. Plus, it helps make the repairs look more professional.
Now, let it dry. This part takes patience. Most sealants need a few hours to set properly, so check the drying time on the tube.
Take your time when applying sealant thoroughly. Rushing this step is a common mistake and can ruin the whole fix.
Step #3 — test for leaks
Once the sealant is dry, it’s time to see if the repair worked.
Grab your garden hose and run water through the gutter. The goal is to spot any water spilling out of the joint.
Move your ladder slowly along the gutter and keep a close eye on both sides of the joint. Look for any drips or trickles.
If you see any, apply a bit more sealant to the problem areas or touch-up spots you might have missed.
You’ve now successfully plugged up a gutter joint leak.
But the repairs aren’t done yet. You need to make sure that the seal will hold up against the weather and that your fix lasts longer.
Step #4 — reinforce the seal
If the leak is stubborn or your gutters are showing their age, adding extra reinforcement can help.
You can use gutter repair tape for a quick and easy reinforcing job. It’s easily available at many hardware stores and is simple to use.
Apply it directly over the sealed joint, pressing down firmly to ensure it sticks well and covers the entire area.
This extra layer can help prevent new leaks, especially in older gutters that are more likely to develop issues.
For even more stability, consider adding a metal gutter clip or a rivet at the joint. This isn’t always a must, but it can keep the joint from shifting or loosening over time.
It’s a small step that can go a long way in making sure your repair holds up during heavy rain.
Step #5 — avoid common mistakes
Before wrapping up, let’s go over a few mistakes that can ruin a good repair job. Avoid these, and you’ll save yourself time and frustration.
- Skipping the cleaning step
An effective repair always starts with a clean gutter. Dirt, rust, and old sealant will keep the new sealant from sticking properly.
If you don’t scrub the joint clean, the repair won’t hold. Take a few extra minutes to clean thoroughly so your repair will last much longer.
- Using too little sealant
It’s tempting to use just a little sealant to keep things neat, but a thin layer won’t hold up.
Apply enough to fully cover the joint and create a strong seal. Be generous, but don’t overdo it. Too much can drip or look messy.
- Rushing the drying process
If the sealant isn’t completely dry, it won’t create a proper seal, and you’ll end up with leaks again.
Follow the drying time recommended on the sealant tube, even if it takes a few hours. Rushing this step is one of the most common reasons gutter joint repairs fail.
- Not testing for leaks
It’s important to test your repair before packing away your tools. Run water through the gutter with a hose and check for drips or leaks around the joint. This makes sure your repair is holding up before the next rainstorm.
- Neglecting extra reinforcement
While not always required, adding a layer of repair tape or a metal clip can strengthen your fix.
It’s a small extra effort that can help prevent future leaks, especially in older or more worn gutters. Consider the extra reinforcement if your gutters have seen better days.

When to call in the professionals
Fixing a leaking gutter joint is usually a simple DIY task, but sometimes calling a professional is the smarter move. Big leaks or issues that keep coming back are signs that the problem might be more serious.
If water is pouring out instead of just dripping, it could mean a deeper issue with your gutter system that needs expert attention.
Extensive damage like cracks, rusted sections, or sagging parts often requires more than just a sealant.
In these cases, a home improvement professional can assess whether a repair will do the job or if a replacement is the better option.
Safety is also the number one priority.
If you’re not comfortable on a ladder or if your gutters are difficult to reach, let a professional handle it.
They have the right equipment and experience to work safely at heights, so you don’t have to risk getting hurt.
Additionally, if your gutters are old and worn out — showing signs like peeling, sagging, or cracks — it might be time for an upgrade.
A professional can guide you through whether a repair will hold up or if it’s smarter to invest in a gutter replacement that will save you trouble down the line.
Don’t risk your safety or waste time on temporary fixes. Let experienced home service professionals in Chicagoland provide a thorough assessment and keep your home dry and secure.